Wednesday, February 26, 2014

DIY Mason Jar Soap Dispensers


I was tired of looking at my plastic bottles of dish and hand soaps at my kitchen sink. The bottles are ugly and I hate storing them under the sink because its a pain in the butt to grab them every time I want to wash the dishes or my hands. I figured let's use mason jars instead of ugly plastic bottles. This project was easy thanks to Danny of course! He taught me how to use the drill but I think he secretly likes helping me on all my projects! Love you babe. So here's how to make these cute mason jar soap dispensers.

First you have to find pumps that you want to use for each jar. I found the top two pumps at the Dollar Tree attached to a bathroom sink soap dispenser. I had to make sure the plastic part on the pumps that goes into the jar would be the right length for my mason jars. The other pump was off of an old Soft Soap dispenser I had laying around the house. Tape off the plastic parts under the pumps to get ready to spray paint. 
Danny helped me drill the right size holes in order to get the pumps to fit tightly onto the lids of the mason jars. Once this is done, it's time to spray paint. 
The color spray paint I used was dark bronze. I let the first cost dry for an hour and the second coat overnight. 
Next it's time to attach the lids and pumps. Put the glue on the bottom of the lid where the lid and pump come together.  We used a waterproof adhesive and let this dry overnight. Than attach the pump, lid and band onto your mason jar full of soap and you're good to go!! Super easy and way cuter then plastic bottles! Xoxo


Thursday, February 20, 2014

Easy DIY Succulent Planter


Succulents are my favorite thing to grow. Mostly because I can't keep anything else alive. Danny's got the green thumb, thankfully! I have tons of succulents growing outside on my patio and wanted to use them to add some plant life in my house. The cool thing about succulents is that you don't have to water them a lot! Perfect for me! I did this project in less then 20 minutes.


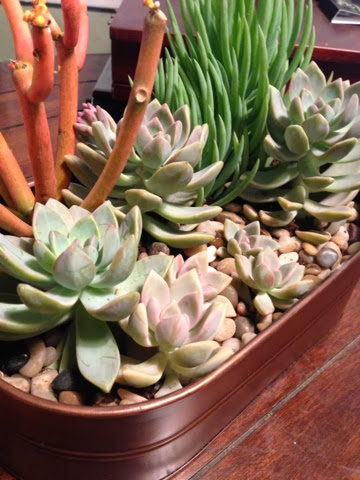
I found this cute, bronzed container at my local goodwill store for $2. I found the rocks at the dollar tree and only needed two bags for this project. Scatter the rocks on the bottom of your container so that none of the container is showing. Since my container doesn't have any drainage holes for when I water, the rocks act as my drainage pan so mold and root rot doesn't occur. 


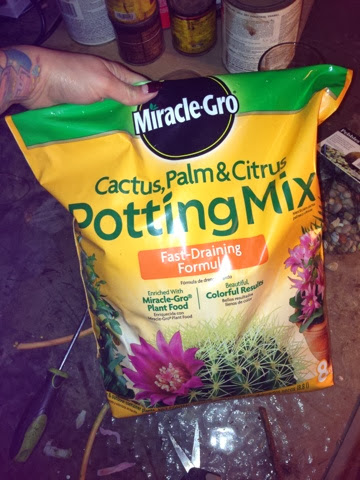
 Fill up your container with cactus potting soil. I went around my backyard and cut the succulents that I wanted to use for this. If you don't have any you can always buy some. They are really inexpensive. Succulents are great because you can cut them off from the original plant and replant them. Just plant the succulents however you want. After I had them planted I put smaller rocks anywhere that the soil showed through. Water and you're done! Super easy and super cute! I only water these once a week by using a spray bottle just to get the soil moist. They don't require tons of water. They like some light so keep them in a bright part of your house, just not in direct sunlight. Enjoy! XoXo


Monday, February 17, 2014

Easy Spinach Cubes for Healthy Smoothies


Fresh, organic spinach is something I can't live without. It's on my grocery list every time I go shopping. I use spinach instead of lettuce for everything. Salads, sandwiches, and for my protein shakes or smoothies. I buy spinach in bulk because its cheaper. Thing is, I can't use it enough before it starts to go bad. Solution, easy spinach ice cubes. Lets get started.

Wash your spinach well and break into pieces. Put the spinach into a food processor with 1/4 cup of water. 

Blend until the spinach is chopped well, and mixes in with the water. It's ok to have chunks of spinach. 

Put the spinach mixture into ice cube trays and freeze overnight. Pop those babies out and put into a zip-lock bag. When you're ready to use them just place 2-3 cubes into your blender along with your other smoothie ingredients, blend and enjoy! You can also use these whenever you need to use spinach. Just defrost or place into your hot pan. Spinach is and anti-inflammatory and is loaded with antioxidants. These spinach cubes make it really easy to get your veggies into your diet. Hope you enjoy!

Wednesday, February 12, 2014

DIY Rustic Pallet Mail Holder or Spice Rack


My pallet obsession continues with this cute, DIY pallet mail holder. I love the old, vintage, rustic look. I swear I shouldn't be living in Southern California but somewhere surrounded by trees and fresh air. Ahhh my dream. Anyways, this holder can be used for other things, not just mail. I'll include a photo of a spice rack I made very similar to this mail holder. I'm going to hang this by my pallet table I made by my front door. Not only can I just throw my mail in this but hang my keys because I added hooks to it. Here I'll show you, step by step, how I made this. Enjoy!

This is the pallet I chose to make my mail holder. I like the nails that were showing because I thought it would add to the rustic look that I love. We cut the pallet into the shape and size I wanted using a jigsaw.  Daniel did this part of course because I would probably saw my arm off if I tried to do it myself. 

 Daniel measured and cut the other parts of the pallet that we weren't using to make the bottom, a shelve and added one more plank to the back so it didn't look so bare. Thanks babe! I seriously couldn't make any of this without you. <3 p="">

After it was constructed I sanded everything down with 80 grit sandpaper. I just sand everything enough to make it smooth so I don't get any splinters. I loveeee my electric sander! Makes everything so much easier. One of my favorite gifts from my man :)
I chose to paint it two colors, just to make it more fun. I use a cheap bristled painting brush to paint on the color. I do it very lightly and sloppy. I like when some of the wood shows through because it makes it look more rustic once you add the stain to it. After the paint has dried (10-20 minutes) I use the sander again to sand over the paint. I do this to make more of the wood shows through for that old, worn out look. If you're not going for the rustic look you can always just paint this any color you like.
I then put the stain over everything using a rag. I find that a rag or sock works a lot better than using a paintbrush. The stain penetrates into the wood a lot better. As you can see the spots we didnt paint and that we sanded look so cool once the stain is on. I love the turquoise and green together. 
I added some hooks and now it's time to add the lettering. I use dafont.com to get free fonts. I then printed out the word "mail" on regular printer paper. I use black carbon transfer paper to transfer my lettering onto the wood. Just trace the letters using a pen with the carbon side of the paper facing down onto your wood. The carbon paper works amazing! Now just paint in your letters and outline the letters so they pop out more. Once that is dry put another layer of the stain over the letters so they look more worn out. Let dry and put polyurethane all over your holder.

My baby, Budi, always helping his Mom out. Isn't he so cute sitting on his chair? This is the stain and polyurethane I used.You have to use both oil based stain and polyurethane. Unless you have water based stain you then have to use a water based polyurethane. Once everything is dry you are done!


I love the way this came out! This is the spice rack I also made. Just cut the pallet longer than the mail holder. All the paint and staining is done the same exact way! Thanks for stopping by! XoXo

Monday, February 10, 2014

Easy DIY Lemon Honey Face Mask


Is your skin feeling tired, dry, or just needs a pick me up?? Why not try this SUPER easy face mask! I'm blessed to have a lemon tree in my backyard so I do this mask twice a week! It leaves my skin feeling soft, moisturized, and brighter. Lemons are full of enzymes that remove dead skin cells and help clear up blackheads, acne and discoloration. Honey is a natural antioxidant and antibacterial.

Benefits of this face mask-
- Clears Acne
- Minimizes pores
- Smooths skin
- Relieves dryness
- Brightens
- Evens out skin tone (with continued use)
- Hydrates skin

How to make mask-
Cut one lemon in half and squeeze gently to release some of the juice. Don't over squeeze because you want the lemon juice to stay on the lemon. Place enough natural raw organic honey to cover the lemon.

How to apply mask-
Rub lemon all over your face until covered in the lemon and honey. That's it! Wait 15 minutes and rinse off with lukewarm water.

Here's a link to a YouTube video of me applying the mask. Enjoy
http://youtu.be/oe3H_ogfou4

My Favorite Primers


I always need to wear a primer under my foundation. No matter what! They help your skin look flawless, and also, it helps your makeup stay on longer. On days that I don’t wear makeup I like to put on a primer just to even out my skin tone and look a little more refreshed. I picked two high end and two drugstore primers to share with you.

Smashbox Photo Finish Color Correcting Primer Blend- I like this because my skin is uneven and blotchy , this helps to even out my skin tone. My skin is oily so I like to use this one with a mattifying foundation because it does tend to get a little greasy after a few hours. Paired with the mattifying foundation it leaves my skin with a healthy dewy finish. $38.00

Benifit Porefessional- My favorite primer of all time!! This is the one I use if I'm not wearing any makeup at all. It helps to even out my skin tone and takes some of my redness away. It also does a great job at minimizing my pores on my forehead, nose and chin. It is beautiful under any foundation. This stuff is great! $30.00

L'oreal Youthcode Pore Vanisher- This recently came out and I had to get it! This is a great dupe for the Benifit Porefessional. Same consistency, color and smell. This doesn't keep me as matte as the Porefessional but that's ok. It still does a great job at minimizing my pores and helping my foundation look perfect. It is kind of pricey for a drugstore product, $24.99. You do get a lot more product then the Benifit Porefessional though. $24.99

L'oreal Magic Perfecting Base- This product is so silky and smooth! Your face feels so soft after applying it. It doesn't minimize my pores but blurs them, if that makes any sense. It just smoothes my skin out to a nice even texture. Your foundation blends so nice on top of this primer. You can't beat the price either! $12.99

Friday, February 7, 2014

My Pallet Obsession


It's safe to say that I'm obsessed with making things out of pallets. Daniel thinks I'm a pallet hoarder. You can just do so many different things with them! Next time I make something out of them (which will be this weekend) I'll post more pictures and more step by step instructions. Here's a little sneak peak on a table I built last weekend.

Habanero Mango Jelly


If you like a little heat and some sweetness at the same time, then this is what you need in your life. This jelly is amazingggg. We use it on toast, English muffins, as a glaze for chicken or ribs, and so much more. It has so much flavor its unreal. I've made it a few times and have perfected it along the way. The heat isn't too much because of the sweetness from the mangos and the secret ingredient, carrots! Carrots are naturaly a sweet vegtable so they're perfect in this jelly. Not only do they add a sweet taste but also a nice texture to the jelly. I just made a batch for Daniel's cousin and I'm getting ready to ship some out to her! I hope she loves it as much as we do!

Habanero Mango Jelly


4-5 Habaneros, cut in half and seeded ( I ware gloves because the habaneros sting my hands)
2 large Mangos, cut into chunks
1 large carrot, about 1/2 cup
1 cup of apple cider vinager
6 cups of sugar
1/2 packet of liquid pectin (unless you like a super firm jelly use no more then a whole packet of liquid pectin)

Blend habaneros, mangos and carrot in a food processor until finely chopped. Put in a medium sized saucepan with the apple cider vinegar and bring to a rapid boil. Add sugar and stir well after each cup is added. Simmer for 40 minutes, stirring often. Make sure nothing sticks to the bottom of the saucepan as it simmers. It will get foamy but just keep stirring if that happens so it doesn't spill over. Remove from the heat and burner after 40 minutes and let sit uncovered for 15 minutes. Stir in pectin and return to a boil. Turn down heat and simmer for 15 minutes. It will seem runny but trust me, it firms up. I put mine into mason jars, let cool to room temperature and enjoy! This makes enough for 3, 12 oz mason jars.

In love with Mario Badescu Products!

I recently discovered the brand Mario Badescu and it's safe to say that I'm obsessed with these products!! I've been using them for a few weeks and have already seen great results! My skin is oily/combination and it's very hard to find products that don't break my skin out. Everything I've tried so far is very gentle on my skin. Here's a breakdown of my favorite products and a link to where you can purchase them!

Cucumber Cleansing Lotion- I use this after I've cleansed my face as a toner. I just apply it to a cotton round and rub it all over my face. It does a great job with getting any excess dirt, makeup, and any leftover oil I have on my face. It leaves my face feeling very refreshed and clean. Other toners I've tried will leave my face feeling super dry and I can't wait to put on a moisturizer after using them but not this one!

Facial Spray with Aloe,Herbs,and Rosewater- I love this facial spray! The smell is amazing! Smells just like a rose.
I use this when I need to add a little more moisture to my face throughout the day, also to set my makeup. I use to use M.A.C.'s fix plus as my makeup setting spray but I wanted to try something different and immediately fell in love with Mario Badescu's. You really can't beat the price either!

Drying Lotion- Anyone who gets pimples needs this product!! It's the best spot treatment for pimples I've ever tried! It's non drying to your skin but really does dry up your pimple. The product is very cool to apply as well. You don't shake the bottle, simply dip a q-tip into the bottle to reach the pink sediment at the bottom, take it out and apply to your pimple. It does leave a pink dot on your face so I recommend using this at night before bed. You'll wake up with the pimple reduced or even gone!

Kristina's Buttermilk Ranch Dressing

Every week my fiance asks me to make this Buttermilk Ranch Dressing receipe for him. It's taken me a few trys to get it right and this is my go to receipe for Ranch Dressing. It's so flavorfull and deleicious. I find myself licking the spoons as I'm making it because the taste is amazing. Unlike any ranch dressing I've tried, store bought or in a resturant. Enjoy!
Buttermilk Ranch Dressing
1 cup buttermilk
1 cup mayonnaise
1/2 cup of sour cream
1 tlbs of dried dill weed
1 tlbs of onion powder
1 tlbs of garlic powder
1 tlbs of dried chives
1 tlbs of dried parsley
2 tlbs vinegar
Add all ingredients in a bowl and mix together. Refrigerate. Then enjoy.