Thursday, June 26, 2014

Diy Lavender Vanilla Pillow / Linen Spray


My friend was telling me how he has a hard time sleeping at night and that he wishes there was a more natural way to help calm his nerves before bed. Rather than taking a pill to help him sleep, I suggested a pillow spray. Of course he never heard of such a product. One of my favorite pillow sprays goes for around $20 a bottle. I knew there had to be a way to make the spray yourself and save some money. This is what I came up with, and it smells heavenly! My friend told me it helped him to relax before he went to sleep. Score!! So I had to make a bottle for myself . Not only do I use it on my pillow and sheets before bed time, I also fill up my iron and mist it while pressing or as a room spray, like you would febreeze. It leaves a light and clean scent. Lavender and Vanilla help to calm your nerves and relax. So whip up your own spray and let the relaxing begin. Enjoy! XoXo


 Fill up a spray bottle with 4 cups of distilled water, 1/4 cup of witch hazel, 25 drops of lavender essential oil, and 20 drops of vanilla essential oil. Shake well.  You can play around with the essential oils to get the scent you're looking for but this is what gave me a light fresh lavender and vanilla scent. Not overpowering at all. Spray away.

Friday, June 20, 2014

Easy & Healthy Fish Tacos for Two


I love a good fish taco. The sauce is what it's all about to me! This is a light meal that is super easy to make. I made it for my husband and I so you can adjust the recipe to serve more people. Enjoy!


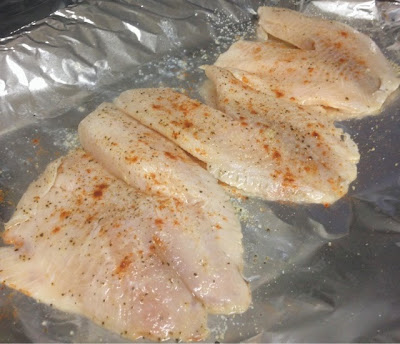
Start by squeezing the juice from one lime on your talipa. Season with pepper, garlic powder, and paprika. I put them in the fridge while I prepare everything else. 


Since I'm just making this meal for two people I used my single serve Ninja cup to blend up my sauce. I didn't measure anything but I'll explain how I made it. I used a spoon and scooped in two nice sized scoops of plain low fat yogurt along with a big spoonful of cut up cilantro, the juice from one lime, and a spoonful of canned chiplote peppers in adobo sauce.  Blend away. I added a little more adobo sauce to give it a more smokier taste. The lime and the adobo makes the perfect pairing for the talipa that's soaking in that lime juice. It ties everything together perfectly. Set the sauce in the fridge and get ready to grill your fish and tortillas. 


Grill your fish on medium high heat until the fish easily flakes off with a fork. I also grilled up a zucchini from our garden. Heat up some whole wheat corn tortillas and you're ready to assemble your tacos.


I made same guacamole using one avocado, a spoonful of cilantro, half of a jalapeno chopped up, and some salt and pepper. I also shredded some Monterrey Jack cheese and carrots then cut up some cabbage. Put the fish, sauce, guacamole, cheese and cabbage on your tortilla with some hot sauce and you have yourself some healthy fish tacos!! 


Amazing! 

Wednesday, June 18, 2014

Transferring Images and Words to a Wood Surface


Making personalized signs are my obsession right now. My handwriting is not the best so any help I can get is great. Sometimes I free hand and paint the words myself but this is my full proof way to get an exact image onto another surface. You can use this method on wood, plastic, canvas, paper, and more! Basically any surface that graphite paper can transfer to. If you can trace an outline, you can do this. I use this method on almost all of the signs that I do. I'm making this wood mermaid sign out of an old table for my patio. (Mermaids, my other obsession) :) Hope you enjoy and learn something new! Thanks for stopping by. 


Start off by using Word and type out what you want your sign to say, using the font of your choice.  Make sure to make the font the proper size to fit your sign. I find that bigger, block letters are easier to go back and paint in than I thinner, smaller font. 


Print.


This is the graphite paper I use. You can use the same little piece of this paper so many times for different projects. I buy it at Micheal's.  


Cut your image out and tape it on the left side edge of the paper.  Place your graphite paper under your image with the darkest side of the paper facing down. You can use a pencil or a pen to trace your image. Trace away! No need to press down hard either, this graphite paper is very pigmented. 

Bam! Got your words or image transferred perfectly to your surface. Paint or use a paint marker to fill in your image or words and you got yourself a personalized sign.


Tuesday, May 6, 2014

Pumpkin Peanut Butter Dog Biscuits


I've been making these treats for my dogs for a few months now and they absolutely love them. My husband's brother works at a pet store and he tells us you wouldn't believe how many treats and food they pull from their shelves because they're not safe for dogs. There's a lot of ingredients you cant even pronounce in some dog treats sold in stores today and that's scary! Store bought treats are often made from fillers and byproducts as opposed to natural and high quality ingredients.  My dogs are my kids and they deserve the best. This recipe is awesome because it has pumpkin in it which is great for a dog's digestive system, it has tons of fiber, vitamin A, iron, and potassium in it.  If you don't have pumpkin puree you can also use applesauce or sweet potato, which are also very healthy for your dog. So go whip up a batch of these tasty dog treats and see how they'll be begging you for more! Enjoy!

Pumpkin Peanut Butter Dog Biscuits


Ingredients: 

2 1/2 cups of whole wheat flour
1 cup of oats
1/2 teaspoon of salt
1/2 teaspoon of cinnamon (optional)
2 large eggs
1 cup of pumpkin puree (sugar free) 
3 tablespoons of chunky peanut butter


Start by combining the first four ingredients in a small bowl and mix.
In a larger bowl combine the last three ingredients.
Blend those ingredients with a hand mixer to assure everything is well blended together.
Slowly add your dry mixture little by little into the wet ingredients until you get a dough. I used a wooden spoon to mix everything all together..
Flour a surface and your rolling pin and roll out the dough to about a half inch thick rectangle.
Cut dough using any cookie cutter shape you have and place on a cookie sheet. No need to grease the cookie sheet. Bake at 350 degrees for 30-40 minutes. I flip the biscuits half way through. Remove to cooling racks and let cool thoughly, about 2 hours. They will harden as they cool down.
Once cooled, place them into a container or zip lock bag.  Budi will literally sit at the counter while they're cooling, waiting for one. They must smell how good they are. Now all that's left is to give them to your furry friends!! Hope your puppies enjoy these as much as mine do! XoXo


Tuesday, April 29, 2014

My must have Makeup Brushes for The Face


I believe that if you want your makeup to look good you need the right brushes to achieve a flawless look. A good brush can make a world of difference when applying your face makeup.  Ive narrowed down my top five must have face brushes that I can't live without. Enjoy xoxo

Starting from the left 

Sigma F80 Flat Top Kabuki Brush-  If you haven't tried Sigma brushes yet, you need too. These brushes are affordable and made really well. They're very comparable to M.A.C. brushes. I can't get enough of this brush! It makes putting on your foundation a breeze. The brush is super soft and dense, making your skin look flawless. This brush blends everything in so easily giving you that airbrushed finish. When I want a full coverage foundation look, this is my go to brush.
http://www.sigmabeauty.com/Sigma_Flat_Top_Synthetic_Kabuki_F_80_p/f80.htm

Sonia Kashuk Small Duo Fiber Multipurpose Brush #124- I think her brushes are amazing! Super affordable and well made.  I use this brush with a translucent powder to set my foundation. The bristles are soft and they don't hold a lot of product so it doesn't cake the product on to your face.
http://www.target.com/p/sonia-kashuk-core-tools-small-duo-fibre-multipurpose-brush-no-124/-/A-13339924?reco=Rec|pdp|13339924|ClickCP|item_page.vertical_1&lnk=Rec|pdp|ClickCP|item_page.vertical_1

M.A.C. 187 Duo Fiber Face Brush- this brush does it all! Kinda on the pricey side but worth every penny. I use this brush to apply powder to set my foundation. Or, when I want to blend out my bronzer or blush so there's not any harsh lines. I've recently started to use this brush for blush too! It lightly applies the blush giving you a more natural look. A must have!!
http://www.maccosmetics.com/product/146/772/Products/Brushes/Face/187-Duo-Fibre-Face-Brush/index.tmpl

E.l.f. Studio small Stippling Brush- this is a lot different than the other two stippling brushes I just mentioned. It's really dense , almost like the sigma brush. I use this to blend out my concealer under my eye. It's perfect because its small for the eye area. I also use it to blend out a cream contour because its nice and small to fit into the hollows of my cheeks. The greatest thing about this brush, it's only $3!!!! Can't beat that! 
M.A.C. 168 Angled Contour Brush- Great brush for contouring or just for applying blush. I use this for both actually. The angle helps you get into the hollows of your cheeks for that beautiful blended out contour.
http://www.maccosmetics.com/product/146/324/Products/Brushes/Face/168-Large-Angled-Contour-Brush/index.tmpl

The Beauty Blender- I'm obsessed with this little guy right now. When I want a more sheer look to my foundation I use this. Which is pretty much everyday. You just get it damp and pat (not rub) your foundation on. The smaller point is great to blend out my concealer and get into those hard to reach places. It's amazing.
http://www.sephora.com/beautyblender-P228913#BVRRWidgetID


Thursday, April 24, 2014

Pallet Planter DIY


I love growing herbs and strawberries! I have different pots and planters all over my backyard. I wanted something that could hold more than one herb or strawberry plant in one planter or pot. I know they make longer planter boxes but what's the fun in just buying one when you can make one?? Special thanks to my hubby who helps me build everything!! He's the best! Enjoy xoxo 

How cute is Budi helping his dad? 
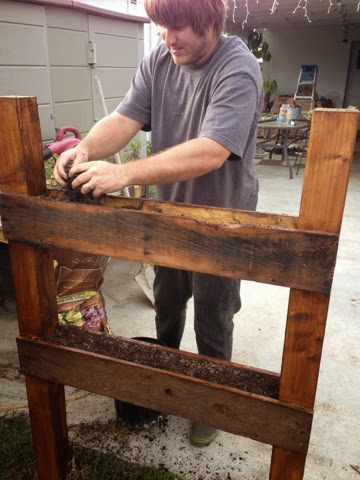
After it was assembled I threw a wood stain on it.
Dig a hole and "plant" your new planter! 
Throw some soil into it with your plants, water and you're good to go! 
I love the way it came out! We're making another one with more shelves too! It's the perfect height and makes it convenient to just pick off whatever I need. 

Wednesday, March 26, 2014

Delicious Chicken Pot Pie


Hey guys!! Sorry I've been M.I.A. I've been super busy with work, school and I got married! I have tons of things I want to blog about but I thought I'd throw this delicious Chicken Pot Pie Recipe up really fast. This is comfort food at its best! It's very easy to make, just time consuming. Enjoy!


 First I start off by roasting two bone in chicken breast in a 375 degree oven for 40-50 minutes. I rubbed each breast with olive oil and salt and pepper. When the chicken is done, cool, then cut off all the chicken from the bone. Cut carrots, and celery. Put in a pot along with frozen peas and cover with enough chicken broth to cover all the veggies. Bring to a boil and cook until veggies are tender but still crisp. Drain veggies from the broth, reserve the broth to use for later.
Put a pie crust in a glass pie dish. I put the pie crust into the oven for 6 minutes. Take out of the oven and put chicken and veggies into the bottom of the pie crust.
In a saucepan over medium high heat cook onions in butter until translucent. Stir in flour, salt, pepper, garlic salt, onion powder and garlic. Slowly stir in chicken broth and milk. Simmer until thick.

Pour mixture over the chicken and veggies until it's almost overflowing. Cover with top crust, seal edges, and cut away any excess dough. Make several small slits in the top to allow steam to escape.Brush the pie crust with egg whites. Bake in the preheated oven for 45-60 minutes or until pie crust is golden brown. Cool for 10-15 minutes before serving. Then eat!!

 Chicken Pot Pie
 2 Bone in Chicken Breast
1 cup peeled and sliced carrots
1 cup frozen green peas
1/2 cup sliced celery
1 cup of diced onion
2/3 cups of butter
2/3 cups of all-purpose flour
1 teaspoon salt
1 teaspoon of black pepper
1 tablespoon of garlic salt
1 tablespoon of onion power
1 tablespoon of garlic
3 cups of chicken broth
1 1/3 cups of milk
2  9 inch unbaked pie crusts